These two, relatively young deer, come frequently to see what we have thrown out. One of them will watch Barbara brush her teeth on the porch and not run off.
There are new leaves on the denuded branches of the tree. But we don't know if they'll survive the 50+ mph winds that have been shaking the house all day today. So far the deer have left them alone.
Chinese puzzle: Barbara wants Don to install kitchen cabinets. First, though, he has to install the plywood layer of the flooring backing. Before that, he really ought to paint the ceiling, which means he needs to put on the texture coat of drywall compound first. To do that, he first had to roller on some nice, thick compound, then go over it with the texture roller.
You gotta thin the mud to just the right consistency, then press it HARD into the ceiling to make sure it sticks. If the consistency is right, you can only do a couple of square feet at a time. Then you can go over it with the texture roller, quick! before it dries.
The finished ceiling. Took three days of brutal work. NOTHING like rollering on paint. The thin spots will look okay after painting.
Here, Don is using up the last of our blue painter's tape to mask off the tops of the walls, prior to painting the ceiling. This would be a whole lot easier if we weren't living here.
First, Don paints the edges of the ceiling with a brush, so he doesn't have to risk getting white paint on the yellow walls when he rollers on the ceiling paint. That's as far as he got this week.
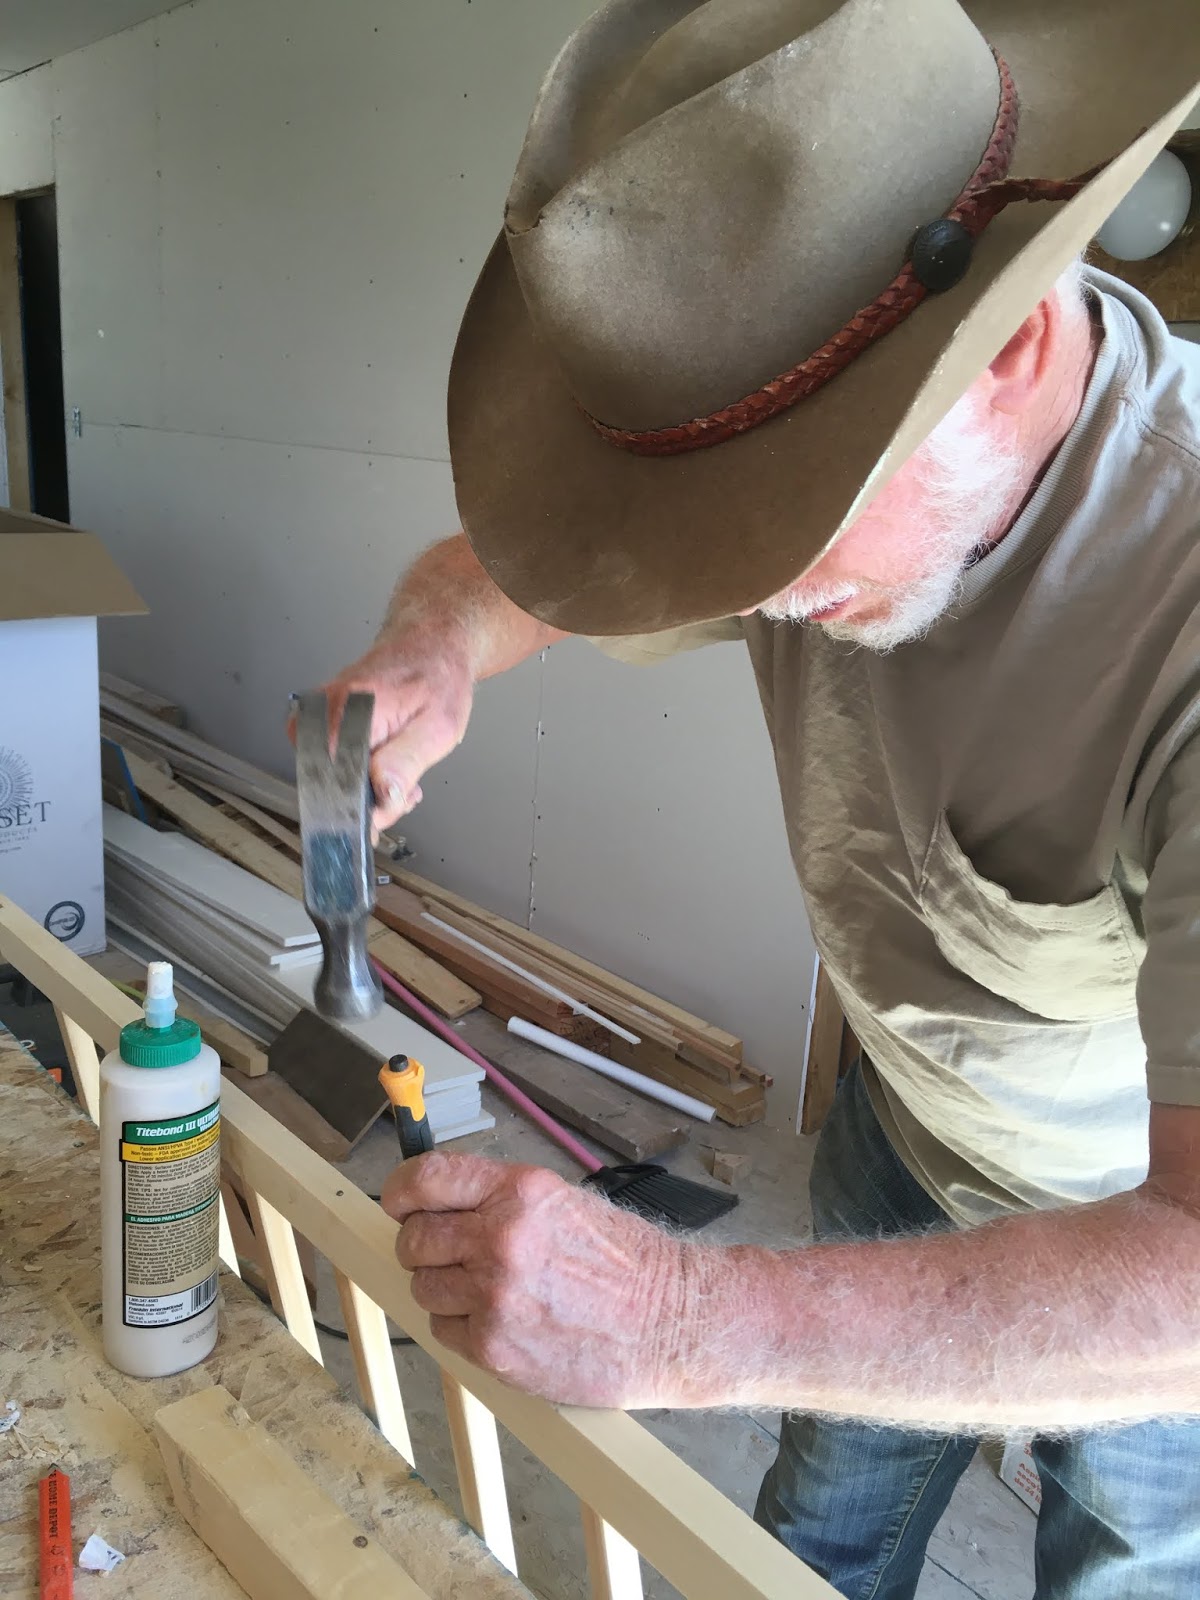
Don's new "toy"-- It's called a doweling plate. You use each of the graduated holes to pound a stick of wood through, until you reach the size dowel you need. Don needs to make round tenons (like very short dowels) on the ends of square pieces of wood, to attach them to the round holes in the balcony gates. Difficult as it is, it's lots easier than mortising out sixty square holes with a tiny chisel would be. Or trying to glue commercial dowels into the ends of square pieces of wood not much bigger than the dowels, without splitting the wood. The dowel plate works!
Don knocked together a stop jig so the tenons would all come out the same length.
Time to assemble the gate. first you put glue in the holes.
Insert the tenons into the glued holes. The sticks are soft wood, and the tenons break off easily.
This is the easy part, which Don can do by hand.
Now for the hard part: putting the tops of all nine dowels into the holes of the top rail simultaneously. You start at one end and work toward the other. But it's still hard. Some of the square dowels aren't perfectly straight. Nor are some of Don's tenons.
... And you gotta work fast; the glue is drying! (and running down your arm)
OOPS! Broke off a tenon.
Using a piece of scrap to protect the top surface of the gate from being marred by the mallet, Don pounds the gate together, seating all of the unbroken dowels simultaneously. (and breaking another one)
How to fix broken off tenons: a lot of glue and a big finish nail. This will be the bottom of the gate, so the nail heads won't show. Nevertheless, Don set them deep with a nail set and puttied and sanded. When painted, they'll be impossible to see. Here, he drives a nail through the edge of the frame, into the end of the tenon.
Using a nail set to drive the nail heads beneath the surface of the wood.
Even though two of the tenons broke, the other seven dowels will be plenty strong enough to hold.
Don likes this purple putty that turns brown when it's dry enough to sand.
Not quite ready to sand, but you can see that the nails will be invisible when painted.
After the glue has begun to dry, Don removed the excess squirted out of the holes with his "famous" sharpened putty knife. When he worked in the cabinet shop in Colorado, Don once had to defend himself with it, against a bully with a Bowie knife. Don kept his putty knife razor sharp, the bully knew it, and backed down when Don called his bluff. Don grew up in a rough neighborhood, saw knife fights in high school, and has been in one real knife fight himself (without getting cut or hurting anyone). The bully with the Bowie knife was a wannabe, and could tell Don was not afraid of him. This is the actual putty knife Don used.
After the dowels are installed and the glue has thoroughly dried, it's time to build the rest of the gate frame around the dowels. Don cut "half-lap" joints in the ends of the frame pieces. They never come out exact, and each joint has to be hand fit and marked for assembly.
The "famous" putty knife also makes a pretty good chisel. The wood is poplar, a medium-hard wood.
A pretty good fit. Just needs a little more work.
The finished gate, temporarily installed on the balcony. When the balcony is completed, it will be disassembled into sections and installed outside.


Comments
Post a Comment